


Let’s examine a particular corner defense in the queen-vs-rook chess end game. We are indebted to Derek Grimmell for his studies and his videos that explain how this kind of endgame works.
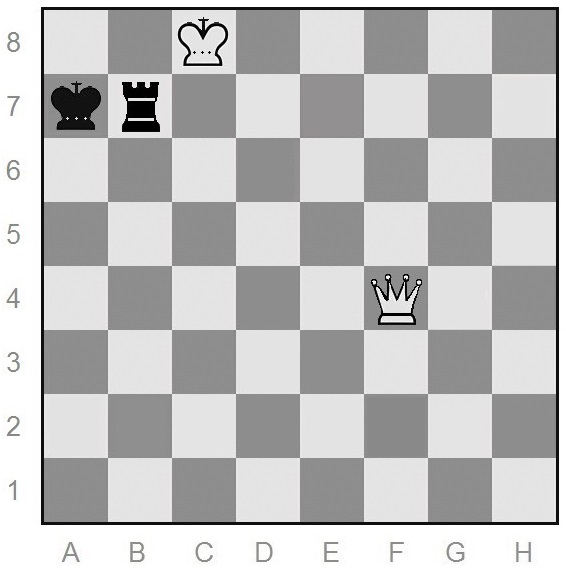
Diagram-1: Black to move (White threatens to win the rook soon after Qa4+)
With black to move, in the above position, there is no reasonable way for the rook to attack either the white king or the queen. Moving the rook to be a knight’s move away from the defending king is often good, so black plays Rb5.
Notice that any king move, in Diagram-1, loses quickly. Ka8 allows the pin Qe4, with mate on the next move. Kb6 loses the rook to a skewer: Qb4+. Ka6 loses the rook almost as quickly after Qa4+. Black is better off playing Rb5 instead a king move.
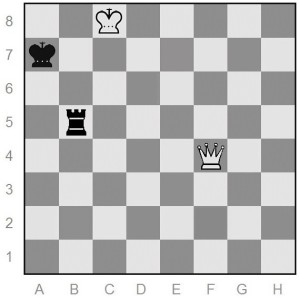
Diagram-2: White to move
After black moves the rook, we have the position in Diagram-2. What can white do? If Qa4+, then the black king escapes to b6, towards the center. If Qc7+, then Ka6 leaves the white king almost trapped on the edge.
White has two moves worth looking at in Diagram-2: Put the queen on the long diagonal with Qe4 or make a rosette, for a rosette is often challenging for the player with the move. But in this position Qe4 allows Rc5+, followed by Kb7, getting the defending pieces further away from the corner.
Let’s look at Qd6, creating a rosette pattern, as Mr. Grimmell calls it.
 Diagram-3: Black to move
In this particular rosette, black cannot move Rb6 because the rook would be pinned by Qd4, and black would quickly lose (Ka8 would then fail to Qa4+ and Ka6 would allow White to play Kc7, threatening both mate and the rook). Black cannot move Rb7, in Diagram-3, without quickly losing the rook to Qa3+ and then Qb4+.
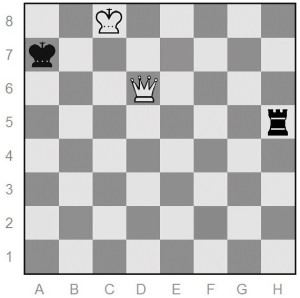
Diagram-4: Black just moved Rh5
White now has a way to prepare to shield the white king and to threaten mate at the same time. Do you see it? It’s Kc7!
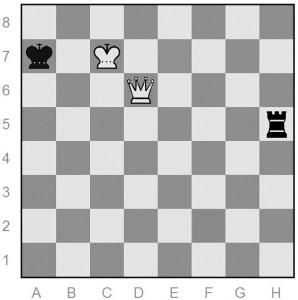
Diagram-5: White moved Kc7!
White now threaten a mate-in-two beginning with Qa3+ and another one beginning with Qb6+. Black has not reasonable choice except to check the white king with Rh7+.
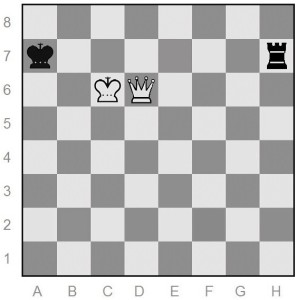
Diagram-6: Black moved Rh7+ and white then moved Kc6
We now see what Grimmell calls the Javelin position, in Diagram-6. Black has the move but what could work better than Rb7, which allows the Philidor position after Qa3+, Kb8, and Qa5? The Philidor is well known in the winning technique. Look instead at Rh1.
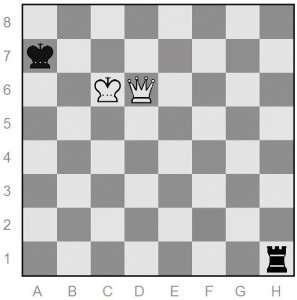
Diagram-7: The black rook now appears safe (white’s move), but is the king safe?
In Diagram-7, black has just moved the rook to h1, apparently putting it on a safe square. But what about the black king? What is that rook doing, other than keeping far away in a safe place? Notice that the defending king is hemmed in at the upper left corner. How many ways does the queen have to make a check while preparing to checkmate? More than one, including Qc7+ and mate next move.
The Philidor position is covered elsewhere, so that’s it for now, for this particular corner defense of the queen versus rook end game.
###
.
Euwe Position of Queen Versus Rook
Moving Rc8 soon results in a fatal back-rank prison for the black king
Two Easy Queen versus Rook Endgame Puzzles
How do you draw when you have only a rook and king and your opponent has only a queen and king?
Queen Versus Rook Corner Defenses
Video by Derek Grimmell
.